Your kitchen dining area deserves more than blank walls. A thoughtfully designed gallery wall transforms this essential space into a personal showcase that reflects your style while creating visual interest during family meals and gatherings.
Gallery walls offer endless possibilities for kitchen wall decor. Whether you prefer vintage charm or modern sophistication, the right combination of frames, artwork, and decorative pieces can elevate your entire room.
These seven kitchen gallery wall ideas provide practical inspiration for creating a stunning focal point. Each approach includes actionable advice on layout design, color coordination, and piece selection that works specifically for dining spaces.
Vintage Plate Collection Display
A vintage plate display brings timeless elegance to kitchen wall decor. This classic approach works beautifully in farmhouse style kitchens and traditional dining areas where decorative plates become the centerpiece of your gallery wall.

Layout Strategy for Plate Arrangements
Start with your largest plate as the anchor piece. Position this focal plate at eye level, typically centered above your dining table or kitchen island. Arrange smaller plates around this central piece in a symmetrical or asymmetric pattern.
The symmetrical approach creates formal balance. Place matching plates at equal distances on both sides of your centerpiece. This layout suits traditional dining spaces and creates a sense of order.
Asymmetric arrangements offer more visual interest. Mix different plate sizes and patterns while maintaining overall balance through careful spacing. This style works well in eclectic or modern farmhouse kitchens.
Color Schemes and Pattern Selection
Choose plates that share a common color palette. Blue and white china creates classic appeal, while earth tones complement natural wood cabinets. Limit your color scheme to three main hues for cohesive visual impact.
- Mix solid colors with patterned plates for depth
- Include plates with similar motifs like florals or geometric designs
- Vary plate sizes from 6 inches to 12 inches for dimension
- Consider texture differences between glossy and matte finishes
- Group plates by era or style for thematic consistency
Hanging Methods for Plate Displays
Plate hangers provide the most secure mounting option. Wire hangers work for lightweight decorative plates, while adhesive disc hangers support heavier pieces without visible hardware.
Install plates directly on drywall using appropriate wall anchors. Space plates 2 to 4 inches apart depending on their size. Larger plates need more breathing room, while smaller pieces can cluster closer together.
Installation Tip: Create a paper template of your layout on the floor first. Tape the template to your wall to visualize spacing before making any holes.
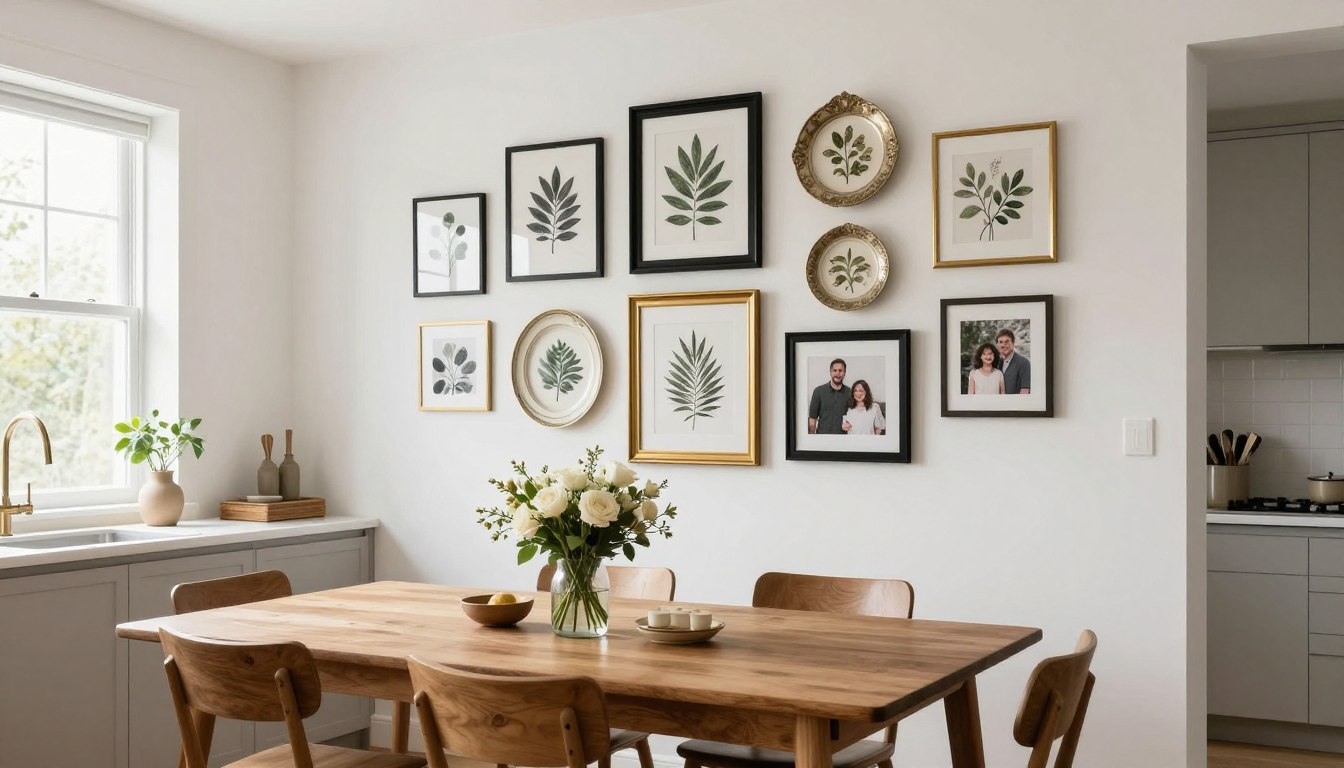
Family Photo Portrait Wall
Family photos transform kitchen dining spaces into personal galleries. This approach celebrates your loved ones while creating warm conversation starters during meals. Photography becomes art when displayed thoughtfully in coordinated frames.

Frame Selection for Photo Galleries
Matching frames create unity across your photo display. Black frames offer timeless sophistication that works with any kitchen style. White frames brighten the space and complement light-colored walls and cabinets.
Wood frames add warmth to kitchen wall decor. Choose frame colors that coordinate with your dining table or cabinet finish. Light oak frames suit Scandinavian-style kitchens, while dark walnut complements traditional spaces.
Photo Layout Techniques
Grid layouts provide clean, organized displays. Arrange photos in perfect rows and columns with equal spacing between each frame. This structured approach works beautifully in modern kitchens with minimalist design elements.
Salon-style hanging offers more creative freedom. Mix frame sizes while maintaining consistent spacing. Start with your largest photo as the anchor, then build outward with smaller pieces.
- Use identical mat widths for visual consistency
- Maintain 2 to 3 inches between frames for balance
- Include photos from different time periods for storytelling
- Mix portrait and landscape orientations for variety
- Update photos seasonally to keep displays fresh
Photography Style Considerations
Black and white photos create sophisticated gallery walls. Convert color photos to monochrome for cohesive presentation. This approach eliminates color conflicts with your kitchen decor and focuses attention on subjects and composition.
Color photos work best when they share similar tones. Choose images with complementary color palettes that coordinate with your kitchen color scheme. Warm-toned photos suit kitchens with wood elements, while cool tones complement modern spaces.
Get Your Free Gallery Wall Planning Template
Download our professional planning guide with measurement charts, layout templates, and expert tips for creating perfectly balanced gallery walls in any space.
Botanical Print Collection
Botanical prints bring natural beauty to kitchen dining areas. These nature inspired pieces add freshness and organic appeal while complementing the culinary theme of your kitchen. Vintage botanical illustrations and modern plant photography both create stunning gallery walls.

Selecting Botanical Artwork
Herb and vegetable prints connect directly to kitchen themes. Choose illustrations of basil, rosemary, thyme, tomatoes, or peppers. These culinary botanicals create thematic cohesion in dining spaces.
Flower prints offer more decorative options. Select blooms that match your color scheme or personal preferences. Roses, peonies, and wildflowers provide varied visual interest while maintaining botanical consistency.
Frame Styles for Botanical Displays
Natural wood frames enhance the organic quality of botanical art. Light wood tones create airy, fresh displays that brighten kitchen spaces. These frames pair beautifully with white or cream-colored walls.
Gold or brass frames add elegance to vintage botanical prints. The metallic finish elevates simple plant illustrations into sophisticated art pieces. This style works particularly well in transitional or traditional kitchens.
- Choose prints with consistent illustration styles
- Maintain uniform frame sizes for grid arrangements
- Include plant names or Latin classifications for educational appeal
- Mix different plant types while keeping similar color palettes
- Consider matting prints in cream or natural tones
Color Coordination Strategies
Green-based prints naturally complement kitchen environments. Choose artwork featuring various shades of green from sage to emerald. These natural tones create calming, cohesive displays that never overwhelm dining spaces.
Neutral botanical prints work with any decor style. Black and white botanical illustrations offer timeless appeal. Sepia toned vintage prints add warmth without introducing competing colors into your kitchen palette.

Mixed Media Eclectic Wall
Mixed media gallery walls celebrate creativity through diverse art forms. This approach combines paintings, prints, photographs, and three-dimensional objects for dynamic visual interest. Eclectic displays work especially well in contemporary and transitional kitchen spaces.

Combining Different Art Forms
Start with flat artwork as your foundation. Include framed prints, paintings, and photography in various sizes. These pieces provide the base layer of your gallery wall before adding dimensional elements.
Add sculptural elements for depth. Small wall mounted shelves can display decorative objects, small plants, or pottery. Woven baskets mounted on the wall introduce texture and organic shapes to your display.
Frame Mixing Techniques
Vary frame styles while maintaining color consistency. Use all black frames or all wood frames in different designs. This approach creates unity through color while allowing style diversity.
Mix frame finishes strategically. Combine matte and glossy black frames, or pair brushed and polished gold frames. These subtle variations add sophistication without creating visual chaos.
- Include pieces of varying visual weight for balance
- Repeat certain colors across different pieces
- Mix vertical and horizontal orientations
- Include at least one large anchor piece
- Leave appropriate negative space between elements
- Add personal touches like handmade art or found objects
Creating Visual Balance
Distribute visual weight evenly across your gallery wall. Place heavier, darker pieces throughout the display rather than clustering them in one area. This creates balanced composition that draws the eye across the entire arrangement.
Use consistent spacing between pieces. Maintain 2 to 3 inches between frames regardless of their size or style. Regular spacing provides structure to eclectic collections and prevents the display from feeling chaotic.
Placement Strategies
Position your largest piece first as the visual anchor. Build your arrangement around this focal point, adding smaller pieces to create balanced composition. Step back frequently to assess overall visual weight distribution.
Minimalist Statement Piece
Single large artworks make powerful statements in kitchen dining areas. This minimalist approach simplifies wall decor while creating maximum visual impact. One well chosen piece can define the entire aesthetic of your dining space.

Selecting Your Statement Piece
Choose artwork proportional to your wall space. The piece should span two-thirds to three-quarters of your dining table width. This creates visual connection between the art and furniture below without overwhelming the space.
Consider your kitchen style when selecting art. Abstract pieces suit modern kitchens, while landscape photography complements transitional spaces. Food related artwork creates thematic consistency in culinary environments.
Color and Subject Matter
Select colors that complement your existing kitchen palette. The artwork should include at least one color present in your kitchen decor, creating visual harmony. Neutral pieces with pops of color offer versatility as kitchen styles evolve.
Abstract art provides timeless appeal. Geometric patterns and organic shapes work well in contemporary kitchens. These non-representational pieces avoid specific trends and maintain relevance through design changes.
- Choose pieces with visual interest that rewards repeated viewing
- Consider texture in addition to color and subject
- Select art that reflects your personal style and interests
- Ensure the piece scale matches your wall dimensions
- Invest in quality framing that protects and enhances the artwork
Framing and Presentation
Simple frames keep focus on the artwork. Thin black or natural wood frames provide structure without competing for attention. Float mounting creates contemporary presentation with visible borders around the art.
Frameless mounting offers ultra-modern aesthetic. Canvas wraps or acrylic-mounted prints need no additional framing. This clean presentation works beautifully in minimalist and Scandinavian-style kitchens.

Floating Shelf Display
Floating shelves offer flexible gallery wall solutions. This approach combines wall art with three-dimensional display space, allowing you to rotate artwork and decorative objects seasonally. Shelf displays work particularly well above dining tables and kitchen islands.

Shelf Selection and Installation
Choose shelf depth based on display plans. Shallow ledge shelves (3 to 4 inches deep) work perfectly for leaning artwork and small decorative pieces. Deeper shelves (8 to 10 inches) accommodate books, plants, and larger objects.
Install shelves at varied heights for visual interest. Stagger shelves vertically rather than aligning them horizontally. This creates dynamic composition while providing multiple display surfaces throughout your wall space.
Layering Artwork on Shelves
Lean framed pieces against the wall without hanging them. This casual approach allows easy rotation and rearrangement. Layer smaller frames in front of larger pieces to create depth and dimension.
Mix frame sizes and orientations on each shelf. Combine vertical and horizontal pieces, overlapping them slightly for layered effect. This technique maximizes display space while creating visually rich arrangements.
- Include varied heights through vertical pieces and objects
- Add greenery with small potted plants or trailing vines
- Display cookbooks as both functional and decorative elements
- Incorporate decorative objects like pottery or sculptures
- Rotate displays seasonally for fresh looks
- Maintain clean lines by avoiding overcrowding
Styling Shelf Displays
Follow the rule of three when styling shelves. Group objects in odd numbers, particularly sets of three or five. This creates naturally balanced arrangements that feel complete without appearing forced.
Vary object heights and shapes for visual interest. Combine tall vertical elements like candles or vases with horizontal books and medium-height objects. This variation creates dynamic displays that engage the eye.
Design Secret: Leave some empty space on your shelves. Negative space prevents cluttered appearance and allows individual pieces to shine. Aim to fill only 60-70% of available shelf space.
Symmetrical Grid Layout
Grid layouts bring order and sophistication to kitchen wall decor. This structured approach creates clean, modern displays that complement contemporary kitchen design. Symmetrical grids work especially well in spaces with strong architectural lines.

Planning Your Grid Layout
Determine your grid dimensions before purchasing artwork. Common configurations include 2×2, 3×3, or 4×2 arrangements. Measure your wall space carefully, allowing 2 to 3 inches between each frame.
Calculate total dimensions including spacing. Add frame widths and spacing together to determine overall arrangement size. This ensures your grid fits properly within your available wall space above the dining table or kitchen island.
Frame and Artwork Selection
Use identical frames for true grid layouts. Matching frames create the clean, organized aesthetic that defines this style. Choose simple frame designs that don’t compete with artwork for attention.
Select artwork with consistent themes or styles. Display a photo series, matching print set, or collection of similar subject matter. This repetition reinforces the structured grid pattern while maintaining visual interest.
- Maintain precise spacing measurements between all frames
- Use a level to ensure perfect alignment
- Choose identical mat sizes for consistency
- Consider numbered or sequential artwork for added cohesion
- Keep artwork scale appropriate to frame size
Installation Techniques
Create a paper template for accuracy. Cut paper to frame size and tape pieces to the wall in your planned grid pattern. This allows you to visualize spacing and make adjustments before installing hardware.
Install the center or top corner frame first. Use this as your reference point for positioning remaining frames. Work methodically outward or downward, checking alignment with each addition.
Square Grid Benefits
Square grids suit most wall proportions. These balanced arrangements work in various kitchen configurations. Equal height and width create pleasing geometric symmetry.

Color Story Themed Wall
Color-coordinated gallery walls create cohesive visual narratives. This approach uses artwork and decorative pieces in complementary or monochromatic color schemes to establish strong design statements. Color themes tie together diverse artwork styles while maintaining overall harmony.

Developing Your Color Palette
Choose colors already present in your kitchen. Pull hues from your cabinets, backsplash, or dining chairs. This creates intentional connection between your gallery wall and existing decor elements throughout the space.
Limit your palette to two or three colors. Monochromatic schemes use various shades of one color for subtle sophistication. Complementary color combinations create more dramatic impact while maintaining cohesion.
Artwork Selection for Color Themes
Mix artwork types within your color story. Combine abstract paintings, photography, prints, and illustrations that share your chosen colors. Varied art styles prevent monotony while color consistency maintains unity.
Include different tones and saturations of your chosen colors. Light and dark variations create depth and visual interest. This tonal range prevents flat, one-dimensional displays.
- Use neutral backgrounds to let colors pop
- Include both bold and muted versions of your colors
- Consider seasonal color schemes you can rotate
- Add texture through varied materials in your color palette
- Balance warm and cool tones for dimension
- Let one color dominate with others as accents
Frame Choices for Color Focused Displays
White frames enhance color focused artwork. Clean white framing acts as visual breathing room, preventing color overload. This neutral choice lets your colorful pieces take center stage.
Natural wood frames add warmth to color displays. Light wood tones complement any color scheme without competing for attention. Wood frames particularly suit organic color palettes featuring greens, blues, and earth tones.
Layout Considerations
Distribute colors evenly across your gallery wall. Avoid clustering all artwork of one color in a single area. Balanced color distribution creates harmonious composition that guides the eye throughout the display.
Vary piece sizes while maintaining color consistency. Large color blocks make strong statements, while smaller pieces add detail and complexity. This size variation creates dynamic arrangements within your cohesive color story.
Color Tip: Use the 60-30-10 rule for balanced color distribution. Let one color dominate 60% of your display, a secondary color fill 30%, and an accent color provide 10% for visual punch.
Bringing Your Kitchen Gallery Wall Vision to Life
Creating the perfect kitchen gallery wall requires planning, patience, and attention to detail. Each of these seven approaches offers unique benefits for transforming your dining area into a personalized space that reflects your style and enhances everyday living.
Start by assessing your kitchen style and available wall space. Consider which approach aligns best with your aesthetic preferences and practical needs. Your chosen gallery wall should complement your existing decor while adding personality to the room.

Practical Implementation Steps
Measure your wall space accurately before purchasing artwork or frames. Account for obstacles like light switches, outlets, or cabinet edges. Proper measurements prevent frustrating returns and ensure your gallery wall fits perfectly.
Gather your materials and plan your layout on the floor first. Arrange frames and artwork in your intended configuration before touching the wall. This preparation allows experimentation without making unnecessary holes.
Maintaining Your Gallery Wall
Dust frames and artwork regularly to maintain their appearance. Use microfiber cloths for frame surfaces and avoid harsh chemicals that might damage finishes. Regular maintenance keeps your display looking fresh and polished.
Rotate artwork seasonally to refresh your space. Swap out pieces quarterly or adjust arrangements to reflect changing tastes. This flexibility keeps your kitchen dining area dynamic and interesting throughout the year.
Your kitchen gallery wall represents more than wall decoration. It creates a personalized environment where daily meals become special occasions, and blank walls transform into curated displays that tell your story.
Whether you choose vintage plates, family photos, botanical prints, or any combination of these ideas, your gallery wall will enhance your kitchen dining experience. Take the first step today toward creating a space that truly feels like home.