Transforming a small outdoor area into a functional cooking space doesn’t require sacrificing style or capability. The right outdoor kitchen design can maximize every inch of your compact patio while delivering everything you need for memorable outdoor meals.
Small outdoor kitchen layouts offer smart solutions for homeowners with limited space. These designs prove that size doesn’t determine functionality.
Whether you’re working with a narrow balcony or a cozy backyard corner, strategic planning turns constraints into creative opportunities. This guide explores seven proven layouts that make the most of tiny outdoor spaces.
Understanding Small Outdoor Kitchen Design Principles

Successful outdoor kitchen ideas for small spaces start with understanding fundamental design principles. The outdoor kitchen must balance aesthetics with practical functionality.
Counter space becomes precious in compact layouts. Every surface needs to serve multiple purposes.
Modern outdoor kitchen designs emphasize vertical storage and wall-mounted accessories. This approach frees valuable floor area while keeping essentials within reach.
Zone Planning
Effective outdoor kitchen design divides the area into distinct functional zones without wasting space.
- Cooking zone with grill and preparation area
- Storage zone for utensils and supplies
- Serving zone for plated food
- Clean-up zone with sink access
Material Selection
Choosing appropriate materials ensures durability while maintaining visual appeal in tight quarters.
- Stainless steel for weather resistance
- Stone countertops for durability
- Weather resistant cabinets for storage
- Non slip flooring for safety
Traffic Flow
Maintaining clear pathways prevents crowding and ensures safe movement around the outdoor kitchen.
- Minimum 36-inch walkways
- Clearance around grill areas
- Access to all storage points
- Emergency exit paths
Utility Access
Planning for essential connections streamlines installation and improves functionality.
- Gas line placement for grills
- Electrical outlets for appliances
- Water supply for sinks
- Drainage considerations

Maximizing Vertical Space
Small spaces benefit tremendously from thinking upward. Vertical storage solutions multiply your usable area without expanding your footprint.
Wall-mounted shelving keeps frequently used items accessible. Hanging racks for utensils and tools free up drawer space for other essentials.

Overhead cabinets provide protected storage for items you don’t use daily. These units keep supplies organized while protecting them from weather exposure.
Layout 1: The Linear Galley Kitchen

The linear galley layout works exceptionally well for narrow outdoor spaces. This outdoor kitchen design places all elements along a single wall, creating an efficient workflow.
This layout maximizes limited space by arranging the grill, counter space, and storage in a straight line. The design keeps everything within arm’s reach.
Key Features and Benefits
Linear outdoor kitchens excel in tight quarters. The streamlined design requires minimal square footage while maintaining full functionality.

Design Specifications
- Typical length: 6-10 feet
- Depth: 24-30 inches
- Requires minimum 8 feet of wall space
- Works along fence lines or building walls
- Ideal for patios 8×10 feet or larger
Essential Components
- Built-in stainless steel grill (24-36 inches)
- Side burner for sauces and sides
- Prep counter space (minimum 18 inches)
- Storage cabinets or drawers
- Optional refrigerator unit

Space-Saving Tips
Optimize your linear outdoor kitchen with smart component choices. Select appliances proportional to your available space.
Do This
- Choose a 24-inch grill for very small spaces
- Install fold-down side shelves
- Use vertical storage above counters
- Mount accessories on the wall
- Select narrow-depth base cabinets
Avoid This
- Oversized grills that dominate the space
- Fixed side tables that waste area
- Excessive floor-level storage
- Cluttered countertop accessories
- Deep cabinets that protrude too far

Perfect For Linear Layouts
This layout works best for side yards, narrow balconies, and spaces along building walls. The design accommodates most outdoor cooking needs while preserving open area for seating.

Layout 2: The L-Shaped Corner Configuration

The L-shaped layout transforms corner spaces into highly functional outdoor kitchens. This outdoor kitchen design utilizes two perpendicular walls for maximum efficiency.
Corner configurations provide more counter space than linear designs while maintaining a compact footprint. The layout creates distinct zones for cooking and preparation.
Layout Advantages
L-shaped outdoor kitchens offer excellent workflow efficiency. The design positions the grill on one leg and prep area on the other, creating a natural cooking triangle.

Advantages
- Maximizes corner space utilization
- Provides ample counter space
- Creates natural work zones
- Protects from wind on two sides
- Accommodates additional appliances
- Efficient traffic flow
Considerations
- Requires corner location
- Needs minimum 10×10 foot area
- More complex installation
- Higher material costs than linear
- Corner storage can be difficult to access
Component Placement
Strategic appliance positioning maximizes the L-shape’s potential. The corner junction becomes a natural pivot point for your outdoor kitchen workflow.

Long Leg Configuration
The longer section typically houses the primary cooking equipment and main prep area.
- Built-in stainless steel grill (30-36 inches)
- Primary prep counter (24-30 inches)
- Storage drawers for utensils
- Side burner for additional cooking

Short Leg Configuration
The shorter section provides additional functionality and storage without overwhelming the space.
- Sink or beverage center
- Secondary prep surface
- Storage cabinets for supplies
- Small refrigerator or ice maker

Corner Solutions
The corner junction presents unique challenges and opportunities. Smart design choices make this area highly functional rather than wasted space.

- Install lazy susan cabinets for easy access
- Use the corner for decorative elements
- Position a pizza oven in the corner
- Create a beverage station at the junction
- Add diagonal cabinets for better access
Design Your Perfect L-Shaped Kitchen
Our outdoor kitchen design experts help you maximize corner spaces with custom layouts. Get professional guidance on appliance selection, material choices, and installation planning.
Layout 3: The Compact Island Station

Freestanding outdoor kitchen islands bring flexibility to small outdoor areas. This layout creates a central focal point while maintaining open space around the perimeter.
Island configurations work particularly well for patios that open to larger outdoor living areas. The design allows access from all sides, promoting social interaction.
Island Design Elements
Compact islands balance cooking capability with spatial efficiency. The key lies in selecting the right size and features for your outdoor area.

| Island Size | Dimensions | Minimum Patio Size | Best Features |
| Micro Island | 4′ x 3′ | 10′ x 10′ | Grill only, minimal counter |
| Small Island | 6′ x 3′ | 12′ x 12′ | Grill, prep space, storage |
| Compact Island | 8′ x 4′ | 14′ x 14′ | Grill, burner, sink, seating |
| Standard Island | 10′ x 4′ | 16′ x 16′ | Full outdoor kitchen features |
Multi-Functional Features
Modern outdoor kitchen islands incorporate features that maximize utility. Each element serves multiple purposes to justify its footprint.

- Install a grill with fold-down side shelves to conserve space when not in use
- Add bar seating on one side for casual dining without separate furniture
- Include storage drawers accessible from multiple sides for efficiency
- Position a small sink or ice bin for beverage service
- Incorporate electrical outlets for small appliances and charging
- Use the island back for hanging utensils and accessories

Placement Considerations
Island positioning affects both functionality and flow. Proper placement ensures the outdoor kitchen enhances rather than obstructs your outdoor space.

Critical Clearances
Maintain 42-48 inches of clearance on all working sides of the island. This space allows comfortable movement and safe operation of appliances. Leave 36 inches minimum on non-working sides for traffic flow.

Strategic Positioning
- Place perpendicular to prevailing winds
- Position for easy access to the house
- Consider sun and shade patterns
- Leave room for seating areas
- Ensure level ground for stability
- Account for utility line access
Island Kitchen Accessories
Enhance your compact island with space-saving accessories designed specifically for small outdoor kitchens.

- Magnetic knife strips and tool holders
- Under counter LED lighting
- Pull out trash and recycling bins
- Towel bars and paper towel holders
- Spice racks and condiment storage
Layout 4: The Fold Out Murphy Kitchen

The Murphy-style outdoor kitchen delivers ultimate space efficiency. This innovative outdoor kitchen design folds completely away when not in use.
Fold-out kitchens solve the challenge of extremely limited outdoor areas. The design maintains full functionality while virtually disappearing between uses.
How Fold Out Systems Work
These outdoor kitchen ideas use hinged panels and locking mechanisms. The system unfolds to reveal cooking surfaces, storage, and work areas.

Closed Configuration
When folded, the kitchen occupies minimal space and protects components from weather.
- Depth of 12-18 inches from wall
- Lockable door panels for security
- Weather-sealed cabinet enclosure
- Decorative exterior finish options

Open Configuration
The unfolded kitchen provides a complete cooking station with surprising functionality.
- Built-in grill surface or burner
- Fold-down prep counter space
- Storage for essential tools
- Optional sink and water connection

Best Applications
Fold-out outdoor kitchens excel in specific situations. Understanding ideal use cases ensures satisfaction with this specialized outdoor kitchen design.

Ideal Scenarios
Consider a Murphy kitchen for apartment balconies, narrow side yards, shared outdoor spaces, seasonal use areas, and locations with strict space requirements. These systems work best where permanent installations aren’t feasible or desirable.
Component Options
Modern fold-out systems offer surprising versatility. Manufacturers now produce complete outdoor kitchen features in compact, foldable formats.

- Electric or propane grills (up to 24 inches)
- Single or dual burner systems
- Integrated cutting boards and prep surfaces
- Built-in storage for utensils and spices
- Optional mini-refrigerator units
- Lighting for evening cooking
- Hook systems for hanging accessories

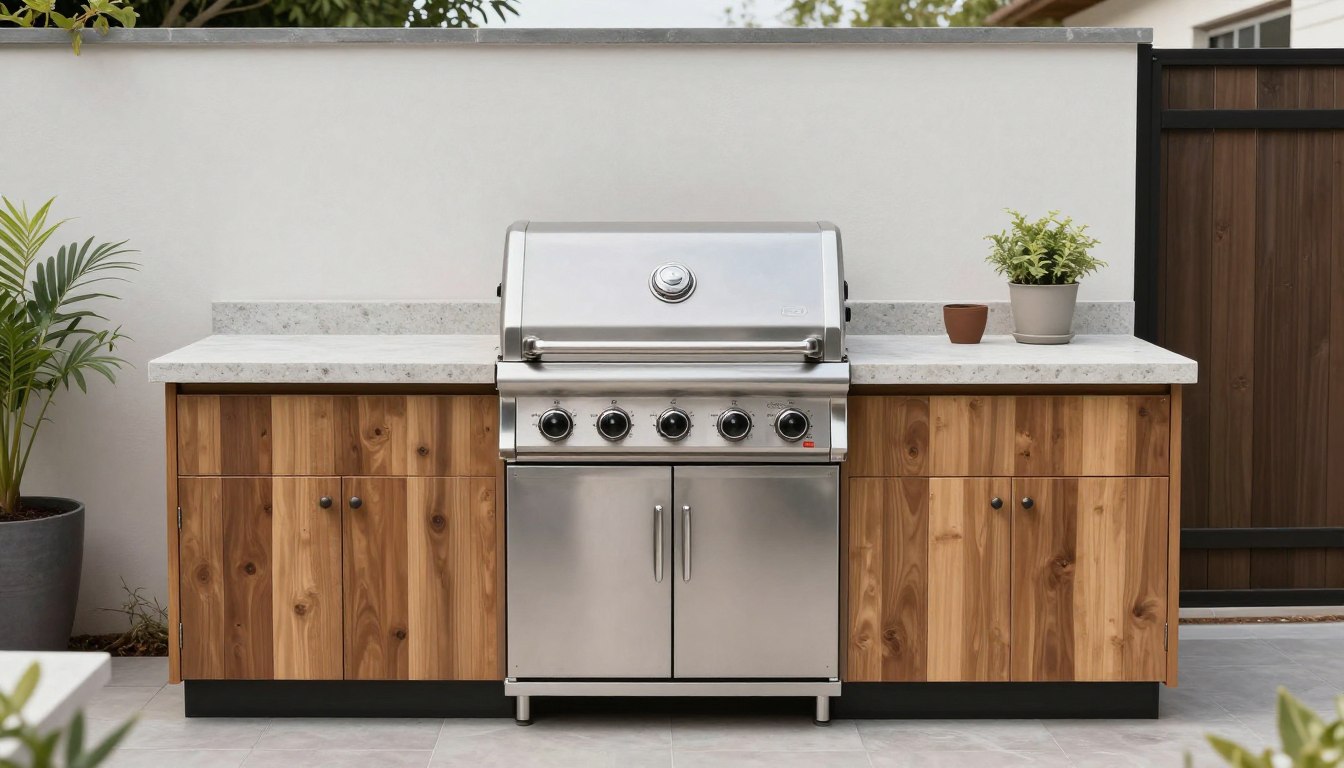
Layout 5: The Cart Based Mobile Kitchen

Mobile cart systems offer maximum flexibility for small outdoor spaces. This outdoor kitchen design moves easily to accommodate different activities and weather conditions.
Cart-based kitchens work perfectly for renters or those who want seasonal flexibility. The design provides full cooking capability without permanent installation.
Cart Configuration Options
Modern outdoor kitchen carts range from simple grill stations to complete cooking centers. The right configuration depends on your cooking style and space constraints.

Basic Grill Cart

Essential cooking with minimal footprint.
- Grill surface (18-24 inches)
- Single side shelf
- Lower storage rack
- Locking caster wheels
Deluxe Cooking Station

Complete outdoor kitchen features on wheels.
- Grill plus side burner
- Expanded counter space
- Enclosed cabinet storage
- Utensil hooks and holders
Modular Cart System

Expandable system with connecting carts.
- Primary grill unit
- Separate prep cart
- Bar/beverage cart
- Carts connect or separate
Mobility Advantages
The ability to reposition your outdoor kitchen creates unique opportunities. Mobile designs adapt to changing needs and conditions.

- Move the kitchen to follow shade throughout the day
- Reposition away from smoke-sensitive areas during cooking
- Roll closer to the house for easy ingredient access
- Store the cart in a garage or shed during off-season
- Adjust position based on guest seating arrangements
- Relocate to covered areas during light rain
Maximizing Cart Efficiency
Strategic accessories transform basic carts into comprehensive cooking stations. The right additions multiply functionality without expanding footprint.


Essential Accessories
- Magnetic tool holders for vertical storage
- Hanging S-hooks for utensils
- Clip on side tables for extra surface
- Under shelf baskets for supplies
- Cutting board that fits over surfaces
- Weather cover for protection
- Propane tank holder with gauge
Safety Considerations
Always lock cart wheels during cooking operations. Ensure the cart sits on level, stable ground before lighting burners. Maintain proper clearances from combustible materials, typically 24 inches minimum. Never move the cart while appliances are hot or in use.
Popular Cart Kitchen Models
Top-rated mobile outdoor kitchen solutions for small spaces.

Layout 6: The Wall Mounted Compact Station

Wall-mounted outdoor kitchens eliminate floor space requirements entirely. This outdoor kitchen design attaches directly to exterior walls or fences.
These systems work exceptionally well for balconies and tiny patios. The design provides serious cooking capability while preserving precious ground area.
Wall Mounted System Components
Modern wall mount outdoor kitchen ideas integrate multiple functions. The systems pack surprising capability into compact, vertical arrangements.

Primary Cooking Unit
The main cooking element mounts securely to the wall with reinforced brackets.
- Wall mount grill (18-30 inches)
- Electric or gas powered options
- Heat-resistant backing plate
- Grease management system
Work Surfaces
Fold down or fixed shelves provide essential counter space without permanent footprint.
- Fold-down prep surfaces
- Fixed side shelves
- Heat resistant materials
- Locking mechanisms for stability
Storage Solutions
Vertical storage keeps tools and supplies organized and accessible.
- Wall-mounted cabinets
- Open shelving units
- Magnetic tool strips
- Hanging hooks and racks
Accessory Options
Additional elements expand functionality without increasing footprint.
- Side burner attachments
- Paper towel holders
- Spice rack systems
- Utensil organizers

Installation Requirements
Proper installation ensures safety and longevity. Wall-mounted outdoor kitchens require specific structural support.

Structural Considerations
Wall mounted grills and counters create significant cantilever loads. Ensure your wall can support 150-300 pounds depending on the system. Masonry walls provide ideal support. Wood frame walls require reinforcement with blocking between studs. Always follow manufacturer specifications for mounting hardware.
- Locate wall studs or masonry anchors for secure mounting
- Install backing boards for distributed weight support
- Use stainless steel hardware rated for outdoor exposure
- Maintain proper clearances from combustible materials
- Ensure level installation for proper grill function
- Plan utility connections before mounting units
Space Optimization Strategies
Vertical organization maximizes the benefits of wall-mounted outdoor kitchen design. Strategic planning creates efficient workflows in minimal space.

Upper Zone (5-7 feet)
- Seasonally used items
- Backup supplies
- Decorative elements
- Light-duty storage
Mid Zone (3-5 feet)
- Primary cooking surface
- Frequently used tools
- Spices and seasonings
- Work surfaces
Lower Zone (0-3 feet)
- Heavy items
- Propane tanks
- Cleaning supplies
- Bulk storage

Layout 7: The Hybrid Modular System

Hybrid modular outdoor kitchens combine multiple layout strategies. This outdoor kitchen design adapts to unique space configurations and changing needs.
Modular systems use independent units that work together. The approach provides maximum flexibility for small outdoor areas with irregular shapes.
Modular Design Philosophy
The modular approach treats each outdoor kitchen function as a separate component. Units connect physically or work independently based on your needs.

Core Module Types
- Grill module with built-in stainless steel grill
- Prep station with counter space and storage
- Sink module with water connections
- Refrigeration unit for cold storage
- Pizza oven module for specialty cooking
- Bar module with seating area
- Storage module with drawers and cabinets


Configuration Benefits
Modular outdoor kitchen ideas provide unmatched adaptability for evolving needs and spaces.
- Start small and expand over time
- Reconfigure layout seasonally
- Replace individual modules without total rebuild
- Adapt to budget constraints
Small Space Modular Strategies
Strategic module selection maximizes functionality in limited outdoor areas. The key lies in choosing components that address your specific cooking style.

Starter Configuration
Minimum viable outdoor kitchen for tight spaces.

- Grill module (30 inches)
- Small prep station
- Total footprint: 5-6 feet
Standard Configuration
Balanced outdoor kitchen for most small patios.

- Grill module
- Prep/storage module
- Sink or bar module
- Total footprint: 8-10 feet
Enhanced Configuration
Full featured outdoor kitchen for maximum capability.

- Grill module
- Prep station
- Sink module
- Storage or specialty unit
- Total footprint: 12-14 feet
Mixing Layout Styles
Hybrid systems combine elements from different layout types. This flexibility solves challenges in irregularly shaped outdoor spaces.

- Combine wall-mounted grill with mobile prep cart
- Pair fixed L-shaped counter with separate mobile island
- Integrate fold out surfaces with permanent base cabinets
- Mix built in modules with freestanding appliances
- Connect linear sections at angles for corner spaces
- Use vertical storage with horizontal work surfaces

Expansion Planning
Modular outdoor kitchens grow with your needs and budget. Smart initial planning accommodates future additions.

Future Proof Design Tips
Leave connection points for utility lines when installing initial modules. Choose systems with standardized sizing for easy additions. Plan counter heights and depths consistently for visual cohesion. Consider traffic patterns for potential expansion areas.
Essential Components for Small Outdoor Kitchens

Selecting appropriate components makes or breaks small outdoor kitchen design. Each element must justify its footprint through functionality.
The outdoor kitchen features you choose determine both capability and space efficiency. Prioritize multi-functional components over single-purpose items.
Primary Cooking Appliances
The grill forms the centerpiece of most outdoor kitchens. Size selection significantly impacts your overall space utilization.

| Grill Size | Cooking Surface | Best For | Space Required | Capacity |
| Compact | 18-22 inches | Balconies, tiny patios | 2-3 feet | 2-4 people |
| Small | 24-28 inches | Small patios | 3-4 feet | 4-6 people |
| Medium | 30-36 inches | Average outdoor kitchens | 4-5 feet | 6-8 people |
| Large | 38-42 inches | Spacious outdoor areas | 5-6 feet | 8-12 people |
Counter Space Solutions
Adequate prep surfaces prove essential for functional outdoor cooking. Small outdoor kitchens require creative counter space approaches.

Fixed Counter Options
- Stone countertops with built-in durability
- Stainless steel surfaces for easy cleaning
- Tile counters for budget-friendly options
- Concrete for custom shapes and sizes
- Marine-grade polymer for lightweight solutions

Flexible Surface Solutions
- Fold-down shelves that stow when not needed
- Slide out cutting boards stored under counters
- Removable prep boards that cover sink areas
- Rolling carts that provide temporary surfaces
- Grill top cutting boards for dual-use space

Storage Systems
Organized storage maximizes usable space in compact outdoor kitchens. Strategic storage design keeps essentials accessible without cluttering counters.

- Deep drawers for pots, pans, and large utensils
- Vertical dividers for baking sheets and cutting boards
- Pull-out trash and recycling bins
- Spice racks mounted inside cabinet doors
- Hanging rails for frequently used tools
- Weather-sealed cabinets for protecting supplies
- Corner lazy susans for maximum access

Specialty Appliances
Additional appliances expand outdoor kitchen capabilities. Selection depends on cooking priorities and available space.

Pizza Ovens

Compact pizza oven models fit small spaces while delivering authentic results.
- Countertop models (12-16 inches)
- Gas or wood-fired options
- Reaches 800°F+ temperatures
Side Burners

Side burners add cooking versatility without requiring much additional area.
- Single or dual burner configurations
- Covers double as counter space
- 12-18 inch footprint
Refrigeration

Compact refrigeration keeps ingredients fresh and beverages cold nearby.
- Under-counter models (24 inches)
- Drawer-style refrigerators
- Ice maker combinations
Material Selection for Durability and Style

Material choices affect both longevity and maintenance requirements. Outdoor kitchen design must withstand weather exposure while maintaining appearance.
The right materials balance durability, aesthetics, and budget. Each outdoor area presents unique environmental challenges.
Stainless Steel Applications
Stainless steel dominates outdoor kitchen construction for good reasons. This material excels in weather resistance and hygiene.

Grade Selection
Not all stainless steel performs equally in outdoor environments.
- 304-grade for most climates and applications
- 316-grade for coastal areas with salt exposure
- Marine-grade for ultimate corrosion resistance
- Brushed finish hides fingerprints and scratches


Common Stainless Steel Uses
- Stainless steel grill bodies and cooking surfaces
- Cabinet door fronts and drawer faces
- Countertop edging and trim pieces
- Sink basins and faucet fixtures
- Appliance housings and panels
- Shelf supports and hardware
Stone and Masonry Options
Stone materials provide timeless appeal and exceptional durability. These natural materials withstand decades of outdoor exposure.

| Material | Durability | Maintenance | Cost | Best Use |
| Granite | Excellent | Low, seal annually | High | Countertops |
| Concrete | Very Good | Medium, seal regularly | Medium | Counters, bases |
| Tile | Good | Medium, grout care | Low-Medium | Surfaces, backsplash |
| Brick | Excellent | Low | Medium | Structure, accents |
| Flagstone | Very Good | Low-Medium | Medium-High | Flooring, surfaces |

Weather-Resistant Wood
Wood brings warmth to outdoor kitchen design when properly selected and treated. Certain species withstand outdoor conditions remarkably well.

Recommended Woods
- Teak – natural oils resist decay
- Cedar – naturally rot-resistant
- Ipe – extremely dense and durable
- Cypress – moisture resistant
- Redwood – natural weather resistance
Avoid These Woods
- Pine – rots quickly outdoors
- Untreated oak – susceptible to moisture
- Poplar – poor outdoor performance
- Maple – cracks and warps
- Birch – deteriorates rapidly

Modern Synthetic Materials
Advanced synthetic materials offer low-maintenance alternatives to natural products. These modern options combine durability with aesthetic appeal.

- Marine-grade polymer cabinets resist moisture and insects
- Porcelain tile withstands freeze-thaw cycles
- Composite decking materials for structural elements
- Powder-coated aluminum for lightweight durability
- High-density polyethylene for cabinet construction
- Acrylic stone for seamless counter surfaces
Space Planning and Critical Measurements

Proper space planning ensures safety and functionality. Small outdoor kitchen layouts require precise measurements and clearance planning.
Understanding minimum dimensions prevents costly mistakes. Each outdoor kitchen element needs adequate space for safe operation.
Essential Clearances
Building codes and safety standards dictate minimum clearances. These requirements protect users and surrounding structures.

Grill Clearances
Grills generate intense heat requiring substantial clearances from combustible materials.
- 24 inches from combustible walls
- 36 inches from overhead structures
- 48 inches of clearance in front
- 10 feet from property lines (typical)
Work Zones
Adequate work areas prevent accidents and improve efficiency during cooking.
- 42 inches minimum aisle width
- 18 inches prep space beside grill
- 36 inches clearance behind cook
- 30 inches for comfortable standing
Counter Heights
Standard dimensions ensure ergonomic comfort during food preparation and cooking.
- 36 inches for standard work surfaces
- 42 inches for bar-height counters
- 30 inches for seated work areas
- 34-38 inches for grill cooking surface
Storage Access
Cabinet and drawer placement affects functionality and user comfort.
- 15-18 inch drawer depths
- 24 inch cabinet depths (standard)
- 12 inch minimum for overhead clearance
- 36 inches between facing cabinets

Traffic Flow Planning
Efficient traffic patterns prevent congestion in small outdoor areas. Strategic planning creates comfortable movement despite limited space.

Work Triangle Principle
The classic work triangle concept applies to outdoor kitchens. Position the grill, prep area, and storage/refrigeration to form a triangle with sides between 4 and 9 feet each. This arrangement minimizes unnecessary movement while cooking.
- Create direct paths between primary work zones
- Avoid placing high-traffic areas behind the cook
- Keep frequently used items within arm’s reach
- Position the outdoor kitchen away from main walking paths
- Consider door swings when planning cabinet placement
- Allow space for multiple users when entertaining
Utility Placement
Gas, water, and electrical connections require careful planning. Proper utility routing prevents future access issues.

Gas Line Considerations
- Route lines underground when possible
- Size appropriately for BTU requirements
- Include shut-off valve at outdoor kitchen
- Use flexible connectors at appliances
- Install where protected from physical damage
- Follow local codes for depth and materials


Electrical and Water
- GFCI outlets for all outdoor receptacles
- Weather-resistant outlet covers
- Dedicated circuits for major appliances
- Water supply with freeze protection
- Proper drainage for sink installations
- Lighting circuits on separate switches
Budget Planning and Cost Control

Small outdoor kitchens offer budget advantages over expansive installations. Smart planning stretches dollars while maintaining quality and functionality.
Understanding cost categories helps prioritize spending. The outdoor kitchen design significantly impacts the total investment required.
Cost Breakdown by Component
Different elements contribute varying amounts to total outdoor kitchen costs. Knowing these proportions guides budget allocation.

| Component | Budget Range | Mid-Range | Premium | % of Total |
| Grill/Cooking | $300-$800 | $1,200-$3,000 | $3,500-$8,000+ | 30-40% |
| Countertops | $200-$500 | $800-$2,000 | $2,500-$5,000+ | 15-25% |
| Cabinets/Storage | $400-$800 | $1,200-$2,500 | $3,000-$6,000+ | 15-20% |
| Utilities/Installation | $500-$1,000 | $1,500-$3,000 | $3,500-$7,000+ | 20-25% |
| Accessories | $200-$400 | $600-$1,200 | $1,500-$3,000+ | 5-10% |
Money-Saving Strategies
Strategic choices reduce costs without sacrificing quality or functionality. Smart shoppers create impressive outdoor kitchens on modest budgets.

- Start with essential components and add features over time
- Choose freestanding appliances over built-in models initially
- Use concrete or tile instead of granite for countertops
- Install basic cabinets and upgrade doors later
- Tackle simple tasks like assembly yourself to save labor costs
- Shop end-of-season sales for appliances and materials
- Consider floor models or last year’s models for grills
- Use standard sizes to avoid custom fabrication charges

Where to Invest for Value
Certain components justify higher investment. These elements affect long-term satisfaction and durability.

Worth the Investment
- Quality stainless steel grill with good warranty
- Durable countertop materials (stone or quality concrete)
- Weather-resistant cabinet construction
- Professional gas line and electrical installation
- Proper foundation and structure support
- Quality faucets and plumbing fixtures
Where to Save
- Decorative elements and accessories
- Cabinet hardware and drawer pulls
- Basic storage shelving
- Standard lighting fixtures
- Simple backsplash designs
- Off-brand small appliances
Phased Installation Approach
Building your outdoor kitchen in stages spreads costs over time. This approach allows budget flexibility while working toward a complete outdoor kitchen.

Phase 1: Core Cooking

Start with essentials for immediate functionality.
- Quality grill
- Minimal counter space
- Basic prep area
- Simple storage
Phase 2: Expansion

Add functionality and convenience features.
- Additional storage
- Side burner
- Sink installation
- Improved counters
Phase 3: Finishing Touches

Complete the outdoor kitchen with luxury elements.
- Refrigeration
- Specialty appliances
- Lighting upgrades
- Decorative elements
Maintenance and Weatherproofing

Proper maintenance extends outdoor kitchen lifespan significantly. Small outdoor kitchens benefit from regular care and seasonal preparation.
Weather protection prevents premature deterioration. The outdoor area exposes materials to harsh conditions requiring proactive maintenance.
Regular Cleaning Schedule
Consistent cleaning prevents buildup and maintains appearance. Different outdoor kitchen components require specific cleaning approaches.

After Each Use
- Clean grill grates while still warm
- Wipe down all stainless steel surfaces
- Remove food debris from counters
- Empty and clean drip pans
- Put away cooking utensils and accessories

Weekly Tasks
- Deep clean grill interior and burners
- Wash stone countertops with appropriate cleaner
- Clean cabinet exteriors and hardware
- Check and clean drain systems
- Inspect gas connections for leaks

Seasonal Preparation
Changing seasons demand specific maintenance actions. Proper seasonal care prevents weather-related damage.

Winter Preparation
Cold weather requires special protection measures in many climates.
- Drain all water lines to prevent freezing
- Remove propane tanks or turn off gas supply
- Apply protective covers to all appliances
- Clean and seal stone surfaces
- Store removable components indoors
- Check weather stripping on cabinets

Spring Opening
Proper reopening ensures safe, functional operation after winter storage.
- Inspect all components for winter damage
- Reconnect utilities and test operations
- Deep clean all surfaces and appliances
- Check igniters and burners function properly
- Lubricate moving parts on drawers and doors
- Touch up any damaged finishes
Material-Specific Care
Different materials require tailored maintenance approaches. Understanding proper care for each material prevents damage.

| Material | Cleaning Method | Frequency | Protection Needed |
| Stainless Steel | Mild soap, grain direction | After each use | Covers when not in use |
| Granite | pH-neutral stone cleaner | Weekly | Seal annually |
| Concrete | Gentle cleaner, soft brush | Bi-weekly | Seal twice yearly |
| Tile | All-purpose cleaner | Weekly | Grout sealer yearly |
| Wood | Wood-specific cleaner | Monthly | Oil/stain annually |
Cover and Protection Systems
Quality covers dramatically extend outdoor kitchen component life. Investment in proper protection pays long-term dividends.

- Custom fit grill covers with ventilation
- Cabinet door covers for harsh weather
- Counter protective covers during off-season
- Umbrella or pergola for shade and rain protection
- Appliance specific covers for refrigerators and pizza ovens
- Retractable awnings for flexible weather protection

Creating Your Perfect Small Outdoor Kitchen

Small outdoor kitchens deliver remarkable functionality when properly designed. The seven layouts presented offer proven solutions for compact outdoor areas.
Your perfect outdoor kitchen design balances space constraints with cooking needs. Each layout style addresses specific spatial challenges while maintaining full capability.
Choosing Your Ideal Layout
Review your outdoor area characteristics and cooking priorities. Match these factors to the layout that best serves your situation.

- Linear layouts excel in narrow spaces along walls or fences
- L-shaped configurations maximize corner areas efficiently
- Island designs create social focal points in open patios
- Fold-out systems suit extremely limited or multi-use spaces
- Cart-based kitchens provide flexibility and portability
- Wall-mounted stations eliminate floor space requirements
- Hybrid modular systems adapt to unique challenges
Implementation Planning
Success requires careful planning before installation begins. A methodical approach prevents costly mistakes and ensures satisfaction.

Pre-Installation Steps
- Measure your outdoor space accurately
- Check local codes and permit requirements
- Determine utility access points
- Set realistic budget parameters
- Identify must have features
- Research product options thoroughly
- Obtain multiple contractor quotes
- Create detailed timeline
Installation Phase
- Prepare site and foundation
- Install utility connections
- Build base structure and cabinets
- Install countertops and surfaces
- Connect appliances and test
- Add finishing touches
- Complete final inspections
- Enjoy your new outdoor kitchen

Maximizing Your Investment
Smart choices during planning and installation create long-term value. These outdoor kitchen ideas enhance both functionality and property value.

Return on Investment
Well designed outdoor kitchens typically return 60-80% of their cost in increased home value. Small, thoughtfully executed outdoor kitchen designs often outperform oversized installations in cost per use value and buyer appeal.
Ready to Build Your Dream Outdoor Kitchen?
Let our experts help you design and install the perfect small outdoor kitchen for your space. From layout planning to final installation, we guide you through every step.
What We Offer
- Free on site space assessment
- Custom layout design service
- Product selection guidance
- Professional installation
- Warranty and support

Your outdoor living space deserves a kitchen that matches your lifestyle. These seven Small Outdoor Kitchen Layouts provide the foundation for creating exceptional outdoor cooking experiences, regardless of your space limitations.
Start planning today. Transform your tiny backyard or patio into an outdoor kitchen that delivers big results in a compact footprint.